Pages

Showing posts with label How to. Show all posts

Saturday, April 26, 2014

Pochade 5th Anniversary - (Still as solid as a tank!)

After many tests and planning I built my pochade box five years ago and made the plans available online for everyone who wants to build one. Many people have bought the detailed step by step plans. They are just $2.99. I would love to hear from them through this post and hopefully receive photos that I can share as well. It would really be wonderful.


I never regretted building my own pochade as opposed to buying one. The cost was one big factor at the beginning. It cost me less than $100 to build mine. Actually much less. But that was not all. I initially built my pochade to withstand a lot of abuse. I noticed that the ones commercially available were too dainty and I needed something that can handle being outdoors regularly not just on occasion. Over the years my pochade has survived countless accidents including falling off the top of the SUV while I drove away, being dropped down a steep hill and tumbling into a stream. You name it it has survived it. I won't even mention all the small  falls, the bangs and tripod drops that I know the more dainty ones would not survive.


The best part is that I feel it is getting stronger every year! The caking of paints and dried oil in cervices has served to make it even more solid. It also gave it an air of experience. It has been in many battles and just keeps getting better by the day.


What is your pochade like? If you built one based on my plans, please share and send me photos to add to this post if you can.


Saturday, June 05, 2010

Additions to the home made Sojourn Pochade

Today I finally published the latest Sojourn Pochade plans. The plans now include:

1) The plan for the Sojourn Pochade (15 1/2" x 12 1/2" x 2 1/2") carrier 11"x 14" panel

2) The plan for the Portage Wet panel Carrier (15" x 12" x 3") carries 6, 11"x14" panels

3) The plan for two Panel Dividers for the Sojourn pochade. These allow the Sojourn pochade to carry either two 6"x8" panels or one 8"x10" and one 5"x7" Panels instead of the 11"x14" panel that it was sized for.

The updated plans have been sent to those who purchased the original plans so they can add the dividers to their project.

I could make other plans for a smaller pochade and wet panel carrier based on the Sojourn, but I will wait to hear from you on your needs first.

It was a lot of fun building and planning this pochade, and I hope many people try it and spread the word about it. I would seriously suggest that it is a better pochade than many commercial ones that are out there.

Sunday, May 16, 2010

Update on the pochade project

The best plans will change as they get executed... So I learned.
This weekend, between fighting a bad cold and keeping up with our growing OPAS group, I went to the hardware stores armed with a detailed shopping list. I had worked out a detailed plan for building my new and superior pochade box and the shopping list was extracted from there.

BTW, as soon as I have it built I will have the plans available but not before. Until it is built, things will remain fluid and I may change things around for a better build.

Anyway, I went to the store armed with a shopping list and once there, I made changes and more changes so that the shopping looks nothing like it did when I started. It is funny, but once you have a clear vision of what you are trying to do, new ideas are easy to incorporate and new directions are not as difficult to adjust for. I must have walked through every isle and looked at most gadgets to see if they would help. The idea is to make this pochade something easy to build with items off the shelf!

All to say I have all the hardware I need now sitting in the garage and all in all the cost is under $100. That includes hardware for both a 14x11 pochade and a wet panel carrier. I also have a brand name for the pochade :) No I don't plan to manufacture, but I do plan to sell the plans at a symbolic price so the name is an identifier and I think it fits. What is it you say? No no no. Not yet :) All in good time.

Monday, September 07, 2009

How to Build a Pochade Box For Plein Air Painting II

UPDATE:
Following numerous requests from readers, I have put together a detailed plan for building a beautiful pochade box. The plan will guide you to build a 15.5”x12.5”x2.5” pochade and an accompanying wet panel carrier – The pochade can carry a single 11”x14” wet panel.

I plan to add dividers shortly, to allow you to carry several size panels and not be limited to 11”x14” size. The dividers will be for the pochade and the wet panel carriers and will allow you to carry 5”x7”, 6”x8” and 8”x10” panels. If there is a need for 9”x11” dividers or any other size, I can make that as well. Please let me know. I can also scale the size down if there is a desire. I just need to hear your feedback.

What is really nice about this plan is that it utilizes off-the-shelf items from your hardware store and the minimum of tools to build. You do not need to be good at carpentry to finish this versatile and professional looking pochade.

The main reason that I built mine and why I am making the plans available is that I am a heavy user of my pochade. I can’t think of spending over $500 on one and use and abuse it as I do. I want one that is rugged and slick at the same time; one that can withstand my abuse without looking like a tank.

I have been building and planning pochades for over 7 years now. They have become successively more versatile and easier to build. This one is the best. I hope you will agree.

To order your plans ($2.99) please click here


Since I posted my video on how to make a cigar box into a painting box for plein air painting, I have had many people email me to ask about the pochade that I featured at the end of the video. I finally took some time this weekend and taped this video about building a full fledged pochade box. It was easier for me to tape and edit this video than to build detailed plans and post them on the Internet. I hope that once you see this video you will be able to build your own pochade box. They are not hard to build really. What took the most time for me was working through the problems and finding ways around them. With this video, you should have very few problems left to work around.


See previous video installment on this topic here:

Monday, May 11, 2009

My Take on Building a Pochade or Cigar Box

UPDATE:
Following numerous requests from readers, I have put together a detailed plan for building a beautiful pochade box. The plan will guide you to build a 15.5”x12.5”x2.5” pochade and an accompanying wet panel carrier – The pochade can carry a single 11”x14” wet panel.

I plan to add dividers shortly, to allow you to carry several size panels and not be limited to 11”x14” size. The dividers will be for the pochade and the wet panel carriers and will allow you to carry 5”x7”, 6”x8” and 8”x10” panels. If there is a need for 9”x11” dividers or any other size, I can make that as well. Please let me know. I can also scale the size down if there is a desire. I just need to hear your feedback.

What is really nice about this plan is that it utilizes off-the-shelf items from your hardware store and the minimum of tools to build. You do not need to be good at carpentry to finish this versatile and professional looking pochade.

The main reason that I built mine and why I am making the plans available is that I am a heavy user of my pochade. I can’t think of spending over $500 on one and use and abuse it as I do. I want one that is rugged and slick at the same time; one that can withstand my abuse without looking like a tank.

I have been building and planning pochades for over 7 years now. They have become successively more versatile and easier to build. This one is the best. I hope you will agree.


I was meaning to build a full tutorial on how to build a pochade box. I may still do that, but in the meantime this should be a good short tutorial that some will find useful. Please share your thoughts here or on YouTube.


See next video installment on this topic here:
http://artezan.blogspot.com/2009/09/how-to-build-pochade-box-for-plein-air.html

Sunday, January 18, 2009

My New Home Made Pochade box

UPDATE:
Following numerous requests from readers, I have put together a detailed plan for building a beautiful pochade box. The plan will guide you to build a 15.5”x12.5”x2.5” pochade and an accompanying wet panel carrier – The pochade can carry a single 11”x14” wet panel.

I plan to add dividers shortly, to allow you to carry several size panels and not be limited to 11”x14” size. The dividers will be for the pochade and the wet panel carriers and will allow you to carry 5”x7”, 6”x8” and 8”x10” panels. If there is a need for 9”x11” dividers or any other size, I can make that as well. Please let me know. I can also scale the size down if there is a desire. I just need to hear your feedback.

What is really nice about this plan is that it utilizes off-the-shelf items from your hardware store and the minimum of tools to build. You do not need to be good at carpentry to finish this versatile and professional looking pochade.

The main reason that I built mine and why I am making the plans available is that I am a heavy user of my pochade. I can’t think of spending over $500 on one and use and abuse it as I do. I want one that is rugged and slick at the same time; one that can withstand my abuse without looking like a tank.

I have been building and planning pochades for over 7 years now. They have become successively more versatile and easier to build. This one is the best. I hope you will agree.

Friday, April 06, 2007

Home Made Watercolour Bijou Box


Update:
It seems that the people at Home Depot rarely know what they have as products. I have received many emails saying that they don't carry shelf edging. NOT TRUE! The do. They are usually kept in black piping that is hug from the bottom of the wood section in the shelf isle. For your convenience, I stole a bar code so you can print it and take it with you and ask them to scan it and maybe that will alert them to the FACT that they have it!! Here it is:


For the watercolour sketchers, The Winsor an Newton Bijou Box has got to be on top of their wish lists. It is a beautifully compact and solid enamelled box that measures 79mm x 60mm x 16mm (or approximately 3" x 2.5" x 3/4"). I have always wanted to have one of these, but since I own two larger Winsor and Newton boxes and have made my own Altoids watercolour boxes before, I could not justify the cost of the Winsor and Newton Bijou Box.

This size box is excellent for carrying around in a pocket for sketching when you are out in the everyday world. It is the size of a Blackberry, and when coupled with a small size pocket sketchbook and a waterbrush, can turn into an instant pocket studio.
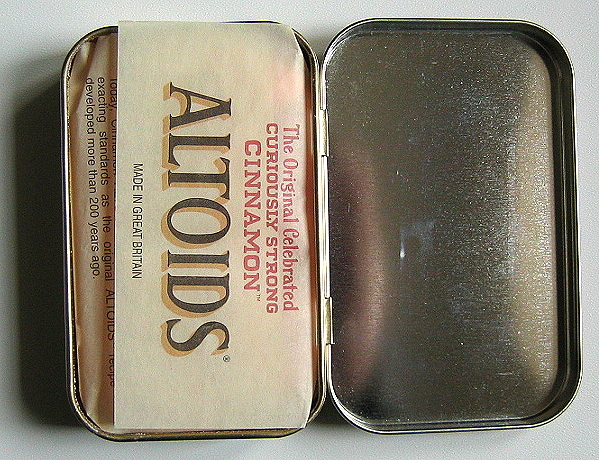
I love my Altoids box. It has been my companion for a while now, but over time it has become loose and clunky and with spring around the corner, it was time to retire it. I had been constantly on the look out for a metal box that approximates the dimensions of the Bijou Box. Call it an ideal, or just the fact that it is a classic and THE one to be imitated. I always look for boxes, mint boxes at convenience stores, metal boxes at garage sales. Anywhere I see a metal box, I try to envision it as a watercolour box.

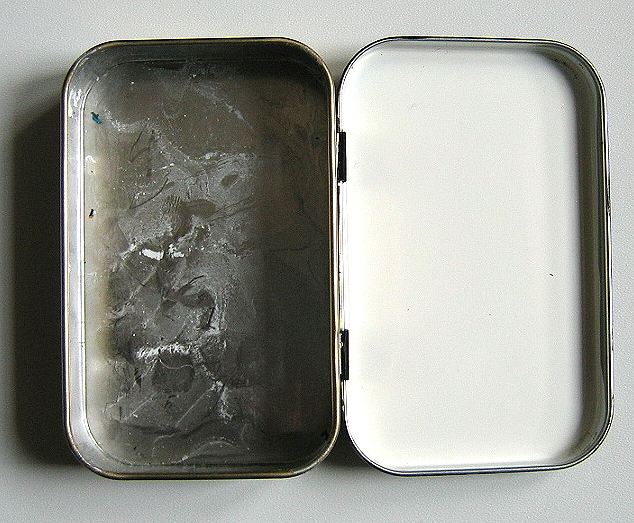
A few months ago I was at a conference where they were giving away mints boxes. They called them "Manage-mints". Smart idea! I didn't care much for the mints, but the box? The dimensions of this small metal box were almost the same as the Winsor and Newton Bijou Box. They are exactly 80mm x 63mm x 17mm. It is professionally covered with white enamel, and I was able to easily remove all the marketing graphics off of the box by using a bit of my wife's Acetone. That left me with a very nice white enamelled box. Granted the Bijou Box is black, but hey! This was the home made version so white would be just fine by me.

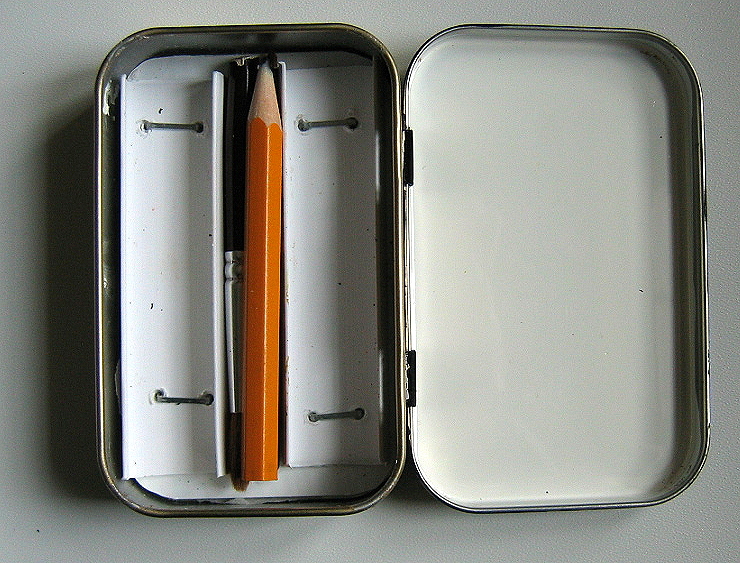
In my earlier work on the Altoids box and in restoring one of my Winsor and Newton boxes, I used 3/4" shelf-edging to hold the pans in the boxes. These shelf edging strips work perfectly and allow you to change the pans and half pans easily, but hold them in place extremely well. For this box, I decided to use 5/8" shelf-edging. If you go to your local hardware store you will actually find three sizes of these shelf-edgings. 3/4", 5/8" and 1/2". The first two sizes will hold half pans very well in different directions, the third size is not useful for our purposes, but I am sure I will find a use for it soon. The reason I used the 5/8" edging is that three strips of that size, will fit perfectly in the box while only two of the 3/4" would fit in and I would be left with significant unused space in the box. Moreover with the two 3/4" strips, I would be able to hold 10 half pans, while with the 5/8" edging, I could fit 12 half pans into this box of 2.4" x 3.0" x 3/4".


Aside from the shelf edging, I needed a plain white vinyl tile, six 1/2" staples (The kind used with a staple gun), and a small piece of white adhesive shelf lining. I also needed the smallest drill bit in my tool box.

I started by measuring the inside of the box and cutting a piece of the vinyl tile to fit snugly in there. I also measured the inside of the cover and cut the shelf lining to size and stuck it there. The white shelf lining makes the inside of the box cover a perfect place mixing colours.

I then cut three strips of the 5/8" shelf edging to fit in the box and secured them to the vinyl tile by drilling holes in the edging and the tile and threading the 1/2" staples in these holes to hold the tile and edging together. The 1/2" staples hold the pieces together very well and you do not have to worry about them becoming unglued if you try to change the half pans. I fit the finished component in to the box, and filled the edging with 12 half pans.

I am ready for spring now. This blackberry-size paint box fits easily in my jacket pocket and with a couple of travel brushes and a small moleskin-like sketch book, I am ready and able to sketch any where, any time.

Watercolour artists fall into two groups: Those who use tube paint, and those who prefer pans and half-pans. Whether you are traveling near or far, you should consider using paint in pan and half-pans in boxes. There is a myth in North America, that you can't get rich colour out of pans. Not true. You can get colours that are just as rich from the pans as you can get from the tube. All you have to do is wet them before you use them. If you are still not convinced that you should give pans a try, maybe this will do the trick: With new carry-on travel restrictions on liquid and jells, tube paints are not likely to make it past the security counter at your local airport. So if you plan to travel with your paint, I hope that this article has given you an idea of how to make your own home made watercolour Bijou Box.

Saturday, March 17, 2007

Another Altoids Watercolour Box

The good folks at the Altoids company keep throwing challenging new boxes my way and I keep taking the bate! The last was this fabulous looking sour chewing gum box. It measures 8.5cm x 3.7cm x 2cm and is about half the size of the regular Altoids box. It also sports a lovely curved top that should serve well in holding water and colour mixes. (You can see my old, well worn, regular Altoids box on the right for comparison)

The smaller size was a real challenge. At these dimensions the box would not hold more than four standard half pans. Four pans would not really make a useful palette for me, so I looked for quarter pans. I know they used to sell those but I just can't find them anymore (If you know where I can find some please let me know). I finally decided to try using the FIMO clay that you can bake to a hard solid shape.

I placed the clay in the metal box, smoothed it and used a round flat felt pen end to press 10 holes in the clay. I then smoothed those and placed the whole thing in a toaster oven at 200 degrees for 20 minutes. I took it out, let it cool down and placed colours in the holes.
I still need to enamel the inner cover to use as a mixing well, but I just had to share this one right away.

The box fits easily in a Jeans pocket and with a waterpen it should be enough for impromptu sketching. Not exactly what I would take with me for a plein-air trip, but for a lunch time break outdoors when spring come? It will work just right!


Wednesday, November 29, 2006

My take on the Altoid box pallet


UPDATE: It seems that the people at Home Depot rarely know what they have as products. I have received many emails saying that they don't carry shelf edging. NOT TRUE! The do. They are usually kept in black piping that is hug from the bottom of the wood section in the shelf isle. For your convenience, I stole a bar code so you can print it and take it with you and ask them to scan it and maybe that will alert them to the FACT that they have it!! Here it is:

In preparation for the 12th Sketchcrawl which takes place on December 9, I have made this pocket size pallet. There are many takes on how to make this pallet. Please see here and here. Mine is a bit more elaborate, but I injoyed doing it and want to share the method with my readers:
You will need an Altoid box or a similar box with an attached lid. Empty the box from the mints (don't eat them all you will get sick!) and clean it well.
The first thing I did to my empty Altoid box was to paint the inner lid enamel white and the outer lid enamel black. The inner lid white enamel color was for a functional purpose. It will serve as a good mixing ground. The outer lid enamel color was for fun and to imitate my favorate Winsor and Newton box. These enamel paints take some time to dry so count on leaving each coat a full 2 days to rest and harden.

In the meanwhile, go to your hardware store and buy a length of Shelf Edging (3/4"), a peal and stick white tile and a box of staple gun staples. You will not need the staple gun. I will tell you why soon.

Measure the inside of the box carefully and cut a piece of the tile to fit in the box. These tiles are made of a soft material that you can cut with scissors easily.

Now cut two lengths of the shelf edging that are a tad bit shorter than the box length. These shelf edgings are plastic and you will need a sharp knife to score them and then bend them to cut. Believe it or not, I suspect that the 3/4 size shelf edging was made to hold full and half pans in place. They are the perfect fit!

Now drill or punch tiny holes in the edging and the tile piece together. You will be threading the staples through these holes and folding them on the back of the tile to hold the edging in place. You can't use a staple gun for this. There isn't one strong enough to go through the plastic of the edging and the tile. Once you have the holes done, thread the staples in and tighten from the back to hold the edging snugly in place on the tile piece. No, glue will not do. You need the strength of the staples to allow for some movement without getting the edging dislodged.

Now place the tile piece with the edging on it in the Altoid box and put your pans or half pans in the edging. Like I said, it holds the pans and half pans very well. You can place up to Ten half pans in the box this way. You will also have room in the middle for shortened brushes and a golf pencil. The edging allows you to replace the half pans very easily depending on your mood or the destination. I hope you enjoy making this project.
If you have any questions post them here, I will try to help.
Update:
Since I posted this Altoids box "how to", I have added a flat plastic mixing tray to the box. I have also worked on a smaller version of the Altoids box here.