
Saturday, June 16, 2018
DIY Watercolor French Easel
Change a french easel to a watercolor easel similar to Joseph Zbukvic's field easel. This is a very easy DIY you can do it with minimal tools and mostly the hardware that comes with the french easel.
Let me know what you think.


Saturday, May 26, 2018
Change your French Easel to a perfect Watercolor Easel DIY
I have always eyed Jospeh Zbukvic's easel with envy. I love how it opens up and allows him to use the drawer as a shelf to place his brushes and palette on it.

I have this old french easel which I don't like because it places the open drawer between me and the painting. For me to get close to the paper, I have to strain my back and lean over the drawer. Whether I sit or stand, that posture is hard on my back and does not allow me the freedom of motion or to be expressive with my brush strokes. Not a good idea.

The same is true for pochade boxes. The box opens with the paper far away from me and the tray right in the middle of things. Again not a good design for watercolors. Having the palette sit between me and the paper, and having the paper sit just about an inch from the colours just does not work for watercolors. Our brushes are short and we do like to touch the paper. Our paints get wet, and in close proximity to the paper accidents are bound to happen.
Pochade and French easels where designed for oil painters. When I paint in oil, I open my pochade at 160 degrees so that the paints are sitting on almost the same slant as my board or canvas. That allows me a closer approach to the painting surface, but with watercolours, I need to have my paints on a level.
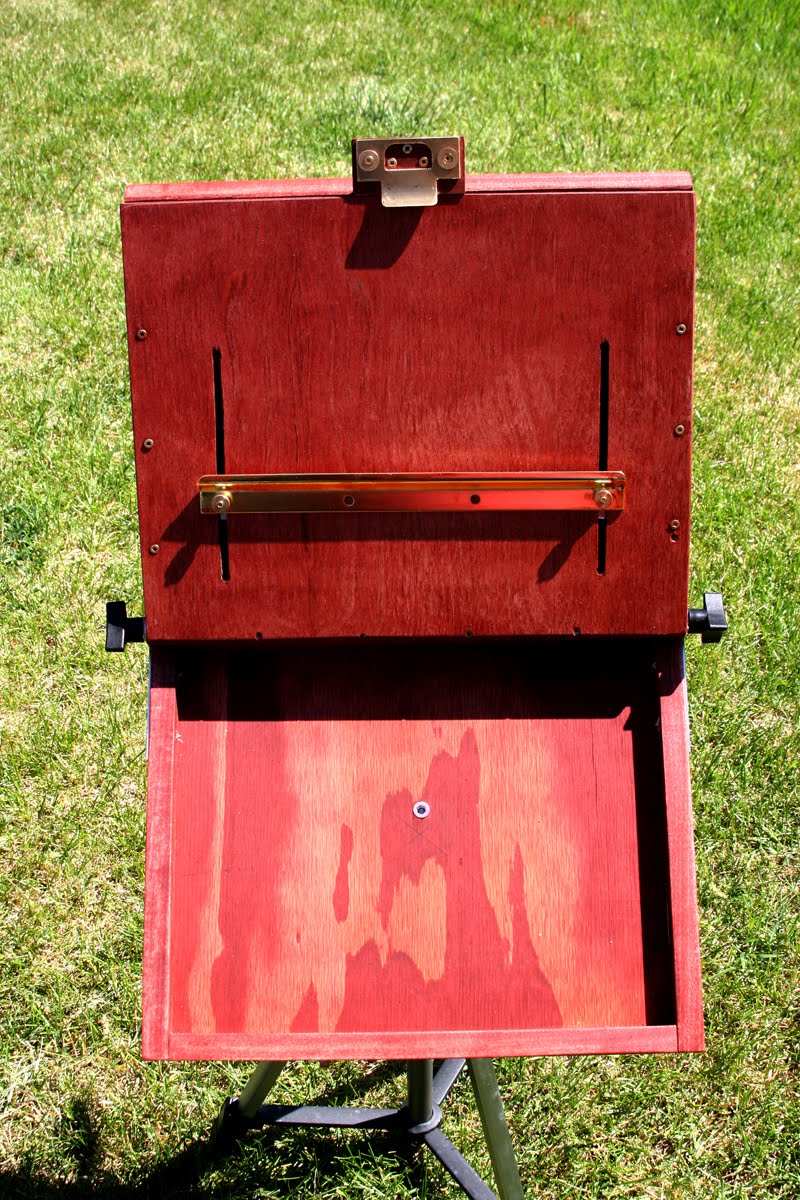
So after studying Joseph's easel for a while, I finally figured out a way to fix my French easel. I removed the top completely leaving behind the legs, base and drawers. I then made a new top that opened sideways and allowed the drawer to be pulled to my right (I am right handed but you can switch that if you are left handed). I made the top flat with a thin shelf to hold my block, or board with taped paper and even built a hook for a water can and a place for my umbrella to sit in. I took it out for a test run last week and it works like a charm.
Here is my fix for the French Easel. I hope you enjoy it!
Tuesday, March 06, 2018
Saturday, December 30, 2017
BIG ANNOUNCEMENT
Finally I am just about ready to announce something big. Something really really big and that will hopefully involve you and me painting together!!!
Monday, December 01, 2014
Watercolors? Make it a large Palette.
For oil painters, the idea of limited palettes is well ingrained. All you need is a warm and cool of each of the primaries and a white and you are basically good to go. This is something artists who start out in oils tend to want to migrate with them to watercolors. You wouldn't think of it for pastels of course, but somehow watercolors are seen as closer to oils in a manner.

That is not exactly true. As a matter of fact there is more in common between pastels and oil paints than with oil paints and watercolors. Mostly pastels and oil paints are used in opaque applications, while watercolors are transparent.

That is the key. It is well known that the more you mix colors, the less vibrant and more muddy they become. In the case of transparent watercolors, I prefer no mixing on the palette at all. If any mixing needs to happen, it is better for that to happen on the paper so that their vibrancy remains intact. That is why I have an embarrassingly large color collection on my palette. I admit that I rarely use more than a few at a time, but I like to have them there ready for use any time I needed them.

The less one mixes watercolors the more these colors reward you in the end. I understand that many of the colors on my palette are not single pigment colors. Some are mixes in their own right, but a color-man's mixture in the milling or composing process is very different from an artist's mixture. One is calibrated and ends up in a consistent product, the other is done in the heat of the painting process.
That is not exactly true. As a matter of fact there is more in common between pastels and oil paints than with oil paints and watercolors. Mostly pastels and oil paints are used in opaque applications, while watercolors are transparent.
That is the key. It is well known that the more you mix colors, the less vibrant and more muddy they become. In the case of transparent watercolors, I prefer no mixing on the palette at all. If any mixing needs to happen, it is better for that to happen on the paper so that their vibrancy remains intact. That is why I have an embarrassingly large color collection on my palette. I admit that I rarely use more than a few at a time, but I like to have them there ready for use any time I needed them.
Saturday, April 26, 2014
Pochade 5th Anniversary - (Still as solid as a tank!)
After many tests and planning I built my pochade box five years ago and made the plans available online for everyone who wants to build one. Many people have bought the detailed step by step plans. They are just $2.99. I would love to hear from them through this post and hopefully receive photos that I can share as well. It would really be wonderful.


I never regretted building my own pochade as opposed to buying one. The cost was one big factor at the beginning. It cost me less than $100 to build mine. Actually much less. But that was not all. I initially built my pochade to withstand a lot of abuse. I noticed that the ones commercially available were too dainty and I needed something that can handle being outdoors regularly not just on occasion. Over the years my pochade has survived countless accidents including falling off the top of the SUV while I drove away, being dropped down a steep hill and tumbling into a stream. You name it it has survived it. I won't even mention all the small falls, the bangs and tripod drops that I know the more dainty ones would not survive.
The best part is that I feel it is getting stronger every year! The caking of paints and dried oil in cervices has served to make it even more solid. It also gave it an air of experience. It has been in many battles and just keeps getting better by the day.
What is your pochade like? If you built one based on my plans, please share and send me photos to add to this post if you can.
Wednesday, April 23, 2014
Narrative In Design - A pastel by Clarence Gagnon

Lucille Rodier Gagnon, Olive and Edna Pretty at Sainte-Pétronille, Île d’Orléans / Clarence Gagnon - 1919
This deceptively simple pastel by Clarence Gagnon is a study in design and composition. The design is not simple or formulaic or done for aesthetics alone as we will see. It impacts directly on the subject of the painting in a way that builds a narrative that can only be told through this design.
At first glance the pastel is a simple image of three ladies sitting on a fence at the edge of a river. The scenery is de-emphasized in favor of the three figures that are painted in higher chroma (brighter), and harmonious colors that make them stand out from the rest of the painting. But is there more about these girls than meets the eye? What is the story?

The blue clothing brings the right and middle figures together in the shape of the letter M forming a bond between them. The white clothing does the same in the shape of a W between the left and right figures. Their harmony of color intermingle to tell us of a friendship or a relation of the three. But something is amiss. While the two figures on the left each has her own lines that signal affinity with the figure on the right, somehow this linear affinity is not shared between them. They are close in proximity, but they each have an underlying secret affinity with the figure on the right.

There is an air of deceptive calmness to the painting that is brought about by the horizontal likes that outline the river banks. these split the painting into three almost equal horizontal areas also adding to the seeming calm. It is when you divide the painting vertically that you start seeing the tension that Gagnon has placed in there. You can clearly see that the left and middle figure have their heads almost touching. This is counter balanced by the further head of the right figure. The direction of the torsos in the figure also echo this affinity of the left and middle figure and the alienation of the right one.

More importantly though if you also draw vertical lines to divide the painting you would see how the tension is so expertly placed. The two figure on the left occupy the calm center of the painting. While the right figure literally teeters on the edge.
The scene is peaceful, but something is not quite right with the ladies in the painting. How complex are their relationship with each other? Are there secrets that are not shared between the three? Gagnon hints to that, but leaves us to build the rest of the narrative. What an amazing painting isn't it?
Wednesday, April 18, 2012
Utility Tray Addition to the Portage Pochade Box
I just finished building an addition to the Portage pochade. This utility tray attaches to the pochade and helps me keep all my gear together and not lose things along the way.

Here is the video on how to build it. If you need help let me know.

Here is the video on how to build it. If you need help let me know.
Saturday, June 05, 2010
Additions to the home made Sojourn Pochade
Today I finally published the latest Sojourn Pochade plans. The plans now include:
1) The plan for the Sojourn Pochade (15 1/2" x 12 1/2" x 2 1/2") carrier 11"x 14" panel
2) The plan for the Portage Wet panel Carrier (15" x 12" x 3") carries 6, 11"x14" panels
3) The plan for two Panel Dividers for the Sojourn pochade. These allow the Sojourn pochade to carry either two 6"x8" panels or one 8"x10" and one 5"x7" Panels instead of the 11"x14" panel that it was sized for.
 The updated plans have been sent to those who purchased the original plans so they can add the dividers to their project.
I could make other plans for a smaller pochade and wet panel carrier based on the Sojourn, but I will wait to hear from you on your needs first.
It was a lot of fun building and planning this pochade, and I hope many people try it and spread the word about it. I would seriously suggest that it is a better pochade than many commercial ones that are out there.
1) The plan for the Sojourn Pochade (15 1/2" x 12 1/2" x 2 1/2") carrier 11"x 14" panel
2) The plan for the Portage Wet panel Carrier (15" x 12" x 3") carries 6, 11"x14" panels
3) The plan for two Panel Dividers for the Sojourn pochade. These allow the Sojourn pochade to carry either two 6"x8" panels or one 8"x10" and one 5"x7" Panels instead of the 11"x14" panel that it was sized for.
 The updated plans have been sent to those who purchased the original plans so they can add the dividers to their project.
I could make other plans for a smaller pochade and wet panel carrier based on the Sojourn, but I will wait to hear from you on your needs first.
It was a lot of fun building and planning this pochade, and I hope many people try it and spread the word about it. I would seriously suggest that it is a better pochade than many commercial ones that are out there.
Monday, May 24, 2010
The Ultimate Do-it-yourself Pochade Box
Ok! I finally did it. After weeks of planning and researching, I think I have built the ultimate pochade box. Here is the launch:
 The Sojourn is a plein air pochade box designed for artists who demand versatility from their tools and expect value at a low price. A one day garage-bench project, the Sojourn - which comes with its own wet panel carrier the Portage - can be built using the minimum of hand tools that are found in most suburban garages. It cost less than $90 in material to build this 12 1/2” x 15 1/2” x 2 1/2" slick pochade box and wet panel carrier, and what’s more you don’t have to be a workshop master to build the Sojourn. Everything you need is readily available at your local hardware store. Just take the shopping list that is provided and check-off the items as you place them in the cart. The detailed easy to follow step by step instructions below along with the diagrams will guide you through the project and help you finish your dream pochade in one rainy day.
 The Sojourn Pochade has no equal in the market. Designed by a plein air artist for plein air artists, it is a light weight box (less than 6Lbs) that comes with its own slick wet panel carrier – the Portage. The Sojourn can carry one 11” x 14”. For longer trips the Portage wet panel carrier can carry up to 6 panels. Drop the Sojourn Pochade and the Portage wet panel carrier in a backpack and you are ready to go. I will be adding plans for partitions so you can turn the carring space to 6x8, 8x10 etc... soon so if you buy the plans, you will also get the partition plans as soon as I have them ready.
I have worked hard to document this pochade and help others build it from everyday material that you can find at the hardware store. As a matter of fact, the shopping list which comes with the plan is all you need to buy to get the project done.

To get the plan click here if you have an iPad or a Mac, you can also get the plans on iBooks or iTunes. Cost? $2.99! The price of a cup of Java! Get it!!

Sunday, May 16, 2010
Update on the pochade project
The best plans will change as they get executed... So I learned.
This weekend, between fighting a bad cold and keeping up with our growing OPAS group, I went to the hardware stores armed with a detailed shopping list. I had worked out a detailed plan for building my new and superior pochade box and the shopping list was extracted from there.
BTW, as soon as I have it built I will have the plans available but not before. Until it is built, things will remain fluid and I may change things around for a better build.
Anyway, I went to the store armed with a shopping list and once there, I made changes and more changes so that the shopping looks nothing like it did when I started. It is funny, but once you have a clear vision of what you are trying to do, new ideas are easy to incorporate and new directions are not as difficult to adjust for. I must have walked through every isle and looked at most gadgets to see if they would help. The idea is to make this pochade something easy to build with items off the shelf!
All to say I have all the hardware I need now sitting in the garage and all in all the cost is under $100. That includes hardware for both a 14x11 pochade and a wet panel carrier. I also have a brand name for the pochade :) No I don't plan to manufacture, but I do plan to sell the plans at a symbolic price so the name is an identifier and I think it fits. What is it you say? No no no. Not yet :) All in good time.
This weekend, between fighting a bad cold and keeping up with our growing OPAS group, I went to the hardware stores armed with a detailed shopping list. I had worked out a detailed plan for building my new and superior pochade box and the shopping list was extracted from there.
BTW, as soon as I have it built I will have the plans available but not before. Until it is built, things will remain fluid and I may change things around for a better build.
Anyway, I went to the store armed with a shopping list and once there, I made changes and more changes so that the shopping looks nothing like it did when I started. It is funny, but once you have a clear vision of what you are trying to do, new ideas are easy to incorporate and new directions are not as difficult to adjust for. I must have walked through every isle and looked at most gadgets to see if they would help. The idea is to make this pochade something easy to build with items off the shelf!
All to say I have all the hardware I need now sitting in the garage and all in all the cost is under $100. That includes hardware for both a 14x11 pochade and a wet panel carrier. I also have a brand name for the pochade :) No I don't plan to manufacture, but I do plan to sell the plans at a symbolic price so the name is an identifier and I think it fits. What is it you say? No no no. Not yet :) All in good time.
Monday, September 07, 2009
How to Build a Pochade Box For Plein Air Painting II
UPDATE:
Following numerous requests from readers, I have put together a detailed plan for building a beautiful pochade box. The plan will guide you to build a 15.5”x12.5”x2.5” pochade and an accompanying wet panel carrier – The pochade can carry a single 11”x14” wet panel.
I plan to add dividers shortly, to allow you to carry several size panels and not be limited to 11”x14” size. The dividers will be for the pochade and the wet panel carriers and will allow you to carry 5”x7”, 6”x8” and 8”x10” panels. If there is a need for 9”x11” dividers or any other size, I can make that as well. Please let me know. I can also scale the size down if there is a desire. I just need to hear your feedback.

What is really nice about this plan is that it utilizes off-the-shelf items from your hardware store and the minimum of tools to build. You do not need to be good at carpentry to finish this versatile and professional looking pochade.
The main reason that I built mine and why I am making the plans available is that I am a heavy user of my pochade. I can’t think of spending over $500 on one and use and abuse it as I do. I want one that is rugged and slick at the same time; one that can withstand my abuse without looking like a tank.
I have been building and planning pochades for over 7 years now. They have become successively more versatile and easier to build. This one is the best. I hope you will agree.
To order your plans ($2.99) please click here

I plan to add dividers shortly, to allow you to carry several size panels and not be limited to 11”x14” size. The dividers will be for the pochade and the wet panel carriers and will allow you to carry 5”x7”, 6”x8” and 8”x10” panels. If there is a need for 9”x11” dividers or any other size, I can make that as well. Please let me know. I can also scale the size down if there is a desire. I just need to hear your feedback.

What is really nice about this plan is that it utilizes off-the-shelf items from your hardware store and the minimum of tools to build. You do not need to be good at carpentry to finish this versatile and professional looking pochade.
The main reason that I built mine and why I am making the plans available is that I am a heavy user of my pochade. I can’t think of spending over $500 on one and use and abuse it as I do. I want one that is rugged and slick at the same time; one that can withstand my abuse without looking like a tank.
I have been building and planning pochades for over 7 years now. They have become successively more versatile and easier to build. This one is the best. I hope you will agree.
To order your plans ($2.99) please click here
Since I posted my video on how to make a cigar box into a painting box for plein air painting, I have had many people email me to ask about the pochade that I featured at the end of the video. I finally took some time this weekend and taped this video about building a full fledged pochade box. It was easier for me to tape and edit this video than to build detailed plans and post them on the Internet. I hope that once you see this video you will be able to build your own pochade box. They are not hard to build really. What took the most time for me was working through the problems and finding ways around them. With this video, you should have very few problems left to work around.
See previous video installment on this topic here:
Monday, May 11, 2009
My Take on Building a Pochade or Cigar Box
UPDATE:
Following numerous requests from readers, I have put together a detailed plan for building a beautiful pochade box. The plan will guide you to build a 15.5”x12.5”x2.5” pochade and an accompanying wet panel carrier – The pochade can carry a single 11”x14” wet panel.
I plan to add dividers shortly, to allow you to carry several size panels and not be limited to 11”x14” size. The dividers will be for the pochade and the wet panel carriers and will allow you to carry 5”x7”, 6”x8” and 8”x10” panels. If there is a need for 9”x11” dividers or any other size, I can make that as well. Please let me know. I can also scale the size down if there is a desire. I just need to hear your feedback.
What is really nice about this plan is that it utilizes off-the-shelf items from your hardware store and the minimum of tools to build. You do not need to be good at carpentry to finish this versatile and professional looking pochade.
The main reason that I built mine and why I am making the plans available is that I am a heavy user of my pochade. I can’t think of spending over $500 on one and use and abuse it as I do. I want one that is rugged and slick at the same time; one that can withstand my abuse without looking like a tank.
I have been building and planning pochades for over 7 years now. They have become successively more versatile and easier to build. This one is the best. I hope you will agree.
I plan to add dividers shortly, to allow you to carry several size panels and not be limited to 11”x14” size. The dividers will be for the pochade and the wet panel carriers and will allow you to carry 5”x7”, 6”x8” and 8”x10” panels. If there is a need for 9”x11” dividers or any other size, I can make that as well. Please let me know. I can also scale the size down if there is a desire. I just need to hear your feedback.
What is really nice about this plan is that it utilizes off-the-shelf items from your hardware store and the minimum of tools to build. You do not need to be good at carpentry to finish this versatile and professional looking pochade.
The main reason that I built mine and why I am making the plans available is that I am a heavy user of my pochade. I can’t think of spending over $500 on one and use and abuse it as I do. I want one that is rugged and slick at the same time; one that can withstand my abuse without looking like a tank.
I have been building and planning pochades for over 7 years now. They have become successively more versatile and easier to build. This one is the best. I hope you will agree.
I was meaning to build a full tutorial on how to build a pochade box. I may still do that, but in the meantime this should be a good short tutorial that some will find useful. Please share your thoughts here or on YouTube.
See next video installment on this topic here:
http://artezan.blogspot.com/2009/09/how-to-build-pochade-box-for-plein-air.html
Sunday, January 18, 2009
My New Home Made Pochade box
UPDATE:
Following numerous requests from readers, I have put together a detailed plan for building a beautiful pochade box. The plan will guide you to build a 15.5”x12.5”x2.5” pochade and an accompanying wet panel carrier – The pochade can carry a single 11”x14” wet panel.
I plan to add dividers shortly, to allow you to carry several size panels and not be limited to 11”x14” size. The dividers will be for the pochade and the wet panel carriers and will allow you to carry 5”x7”, 6”x8” and 8”x10” panels. If there is a need for 9”x11” dividers or any other size, I can make that as well. Please let me know. I can also scale the size down if there is a desire. I just need to hear your feedback.
What is really nice about this plan is that it utilizes off-the-shelf items from your hardware store and the minimum of tools to build. You do not need to be good at carpentry to finish this versatile and professional looking pochade.
The main reason that I built mine and why I am making the plans available is that I am a heavy user of my pochade. I can’t think of spending over $500 on one and use and abuse it as I do. I want one that is rugged and slick at the same time; one that can withstand my abuse without looking like a tank.
I have been building and planning pochades for over 7 years now. They have become successively more versatile and easier to build. This one is the best. I hope you will agree.
I plan to add dividers shortly, to allow you to carry several size panels and not be limited to 11”x14” size. The dividers will be for the pochade and the wet panel carriers and will allow you to carry 5”x7”, 6”x8” and 8”x10” panels. If there is a need for 9”x11” dividers or any other size, I can make that as well. Please let me know. I can also scale the size down if there is a desire. I just need to hear your feedback.
What is really nice about this plan is that it utilizes off-the-shelf items from your hardware store and the minimum of tools to build. You do not need to be good at carpentry to finish this versatile and professional looking pochade.
The main reason that I built mine and why I am making the plans available is that I am a heavy user of my pochade. I can’t think of spending over $500 on one and use and abuse it as I do. I want one that is rugged and slick at the same time; one that can withstand my abuse without looking like a tank.
I have been building and planning pochades for over 7 years now. They have become successively more versatile and easier to build. This one is the best. I hope you will agree.
Friday, April 06, 2007
Home Made Watercolour Bijou Box

Update:
 It seems that the people at Home Depot rarely know what they have as products. I have received many emails saying that they don't carry shelf edging. NOT TRUE! The do. They are usually kept in black piping that is hug from the bottom of the wood section in the shelf isle. For your convenience, I stole a bar code so you can print it and take it with you and ask them to scan it and maybe that will alert them to the FACT that they have it!! Here it is:
For the watercolour sketchers, The Winsor an Newton Bijou Box has got to be on top of their wish lists. It is a beautifully compact and solid enamelled box that measures 79mm x 60mm x 16mm (or approximately 3" x 2.5" x 3/4"). I have always wanted to have one of these, but since I own two larger Winsor and Newton boxes and have made my own Altoids watercolour boxes before, I could not justify the cost of the Winsor and Newton Bijou Box.
This size box is excellent for carrying around in a pocket for sketching when you are out in the everyday world. It is the size of a Blackberry, and when coupled with a small size pocket sketchbook and a waterbrush, can turn into an instant pocket studio.
I love my Altoids box. It has been my companion for a while now, but over time it has become loose and clunky and with spring around the corner, it was time to retire it. I had been constantly on the look out for a metal box that approximates the dimensions of the Bijou Box. Call it an ideal, or just the fact that it is a classic and THE one to be imitated. I always look for boxes, mint boxes at convenience stores, metal boxes at garage sales. Anywhere I see a metal box, I try to envision it as a watercolour box.
 A few months ago I was at a conference where they were giving away mints boxes. They called them "Manage-mints". Smart idea! I didn't care much for the mints, but the box? The dimensions of this small metal box were almost the same as the Winsor and Newton Bijou Box. They are exactly 80mm x 63mm x 17mm. It is professionally covered with white enamel, and I was able to easily remove all the marketing graphics off of the box by using a bit of my wife's Acetone. That left me with a very nice white enamelled box. Granted the Bijou Box is black, but hey! This was the home made version so white would be just fine by me.
 In my earlier work on the Altoids box and in restoring one of my Winsor and Newton boxes, I used 3/4" shelf-edging to hold the pans in the boxes. These shelf edging strips work perfectly and allow you to change the pans and half pans easily, but hold them in place extremely well. For this box, I decided to use 5/8" shelf-edging. If you go to your local hardware store you will actually find three sizes of these shelf-edgings. 3/4", 5/8" and 1/2". The first two sizes will hold half pans very well in different directions, the third size is not useful for our purposes, but I am sure I will find a use for it soon.
  The reason I used the 5/8" edging is that three strips of that size, will fit perfectly in the box while only two of the 3/4" would fit in and I would be left with significant unused space in the box. Moreover with the two 3/4" strips, I would be able to hold 10 half pans, while with the 5/8" edging, I could fit 12 half pans into this box of 2.4" x 3.0" x 3/4".
 It seems that the people at Home Depot rarely know what they have as products. I have received many emails saying that they don't carry shelf edging. NOT TRUE! The do. They are usually kept in black piping that is hug from the bottom of the wood section in the shelf isle. For your convenience, I stole a bar code so you can print it and take it with you and ask them to scan it and maybe that will alert them to the FACT that they have it!! Here it is:
For the watercolour sketchers, The Winsor an Newton Bijou Box has got to be on top of their wish lists. It is a beautifully compact and solid enamelled box that measures 79mm x 60mm x 16mm (or approximately 3" x 2.5" x 3/4"). I have always wanted to have one of these, but since I own two larger Winsor and Newton boxes and have made my own Altoids watercolour boxes before, I could not justify the cost of the Winsor and Newton Bijou Box.
This size box is excellent for carrying around in a pocket for sketching when you are out in the everyday world. It is the size of a Blackberry, and when coupled with a small size pocket sketchbook and a waterbrush, can turn into an instant pocket studio.
I love my Altoids box. It has been my companion for a while now, but over time it has become loose and clunky and with spring around the corner, it was time to retire it. I had been constantly on the look out for a metal box that approximates the dimensions of the Bijou Box. Call it an ideal, or just the fact that it is a classic and THE one to be imitated. I always look for boxes, mint boxes at convenience stores, metal boxes at garage sales. Anywhere I see a metal box, I try to envision it as a watercolour box.
 A few months ago I was at a conference where they were giving away mints boxes. They called them "Manage-mints". Smart idea! I didn't care much for the mints, but the box? The dimensions of this small metal box were almost the same as the Winsor and Newton Bijou Box. They are exactly 80mm x 63mm x 17mm. It is professionally covered with white enamel, and I was able to easily remove all the marketing graphics off of the box by using a bit of my wife's Acetone. That left me with a very nice white enamelled box. Granted the Bijou Box is black, but hey! This was the home made version so white would be just fine by me.
 In my earlier work on the Altoids box and in restoring one of my Winsor and Newton boxes, I used 3/4" shelf-edging to hold the pans in the boxes. These shelf edging strips work perfectly and allow you to change the pans and half pans easily, but hold them in place extremely well. For this box, I decided to use 5/8" shelf-edging. If you go to your local hardware store you will actually find three sizes of these shelf-edgings. 3/4", 5/8" and 1/2". The first two sizes will hold half pans very well in different directions, the third size is not useful for our purposes, but I am sure I will find a use for it soon.
  The reason I used the 5/8" edging is that three strips of that size, will fit perfectly in the box while only two of the 3/4" would fit in and I would be left with significant unused space in the box. Moreover with the two 3/4" strips, I would be able to hold 10 half pans, while with the 5/8" edging, I could fit 12 half pans into this box of 2.4" x 3.0" x 3/4".
  Aside from the shelf edging, I needed a plain white vinyl tile, six 1/2" staples (The kind used with a staple gun), and a small piece of white adhesive shelf lining. I also needed the smallest drill bit in my tool box.
I started by measuring the inside of the box and cutting a piece of the vinyl tile to fit snugly in there. I also measured the inside of the cover and cut the shelf lining to size and stuck it there. The white shelf lining makes the inside of the box cover a perfect place mixing colours.
 I then cut three strips of the 5/8" shelf edging to fit in the box and secured them to the vinyl tile by drilling holes in the edging and the tile and threading the 1/2" staples in these holes to hold the tile and edging together. The 1/2" staples hold the pieces together very well and you do not have to worry about them becoming unglued if you try to change the half pans. I fit the finished component in to the box, and filled the edging with 12 half pans.
 I am ready for spring now. This blackberry-size paint box fits easily in my jacket pocket and with a couple of travel brushes and a small moleskin-like sketch book, I am ready and able to sketch any where, any time.
Watercolour artists fall into two groups: Those who use tube paint, and those who prefer pans and half-pans. Whether you are traveling near or far, you should consider using paint in pan and half-pans in boxes.
 There is a myth in North America, that you can't get rich colour out of pans. Not true. You can get colours that are just as rich from the pans as you can get from the tube. All you have to do is wet them before you use them. If you are still not convinced that you should give pans a try, maybe this will do the trick: With new carry-on travel restrictions on liquid and jells, tube paints are not likely to make it past the security counter at your local airport. So if you plan to travel with your paint, I hope that this article has given you an idea of how to make your own home made watercolour Bijou Box.
Monday, March 19, 2007
Pink Panther's Update
 Events sometime have a way of falling in place in a surrealistic way. After I posted my nostalgia entry about our band a few days ago, and within the day, I was reconnected with Pierre Kerbage our gifted keyboard player. It seems he was living in Austin Texas all this time. The kicker is that I lived in Austin for 7 years and we never connected there!!
 Now for nearly 32 years, we have not seen or heard from each other whatsoever. Over the years, I had tried hard to find my closest friend in High school, our lead guitarist Ralph Shami (AKA Chami) but without luck. My latest attempt, a few years back was an email I sent to an R. Shami who bluntly told me he was not the guy and warned me not to spam him!
 Today while Pierre and I were on the phone chatting for the first time in 30 some years, we Googled Ralph and for some reason Pierre tried Chami instead of Shami. We found an email address, sent a ping and.... YES!!!!!!!!!!!!!!!!!!!!!!! We found him!!!!!!!!!!!!!!!!!!!!!
 Dr. Chami, a former professor at Notre Dame and now with the IMF no less. After a quick email exchange, Ralph called Pierre promptly and we had a three way conversation. It was surreal.
 The day was spent in a flurry of emails and tonight I still can't believe that all this happened.
So here is the update on the Pink Panthers:
- Pierre Kerbage (Keyboard wizard) is now president and CEO of his company Managed IT Services in Austin Texas
- Ralph Chami (Lead Guitar Magician) is a Division Chief with the IMF Institute in Washington DC
- Fawzan Barrage (me Singer/Rhythm Guitarist) is a Financial Sales Executive in Toronto
- Emile Bustani (Drummer) Is still in Beirut Lebanon and a professional musician as well.
- Jamal Hamadeh (Yes Ralph remembered his name) Our Base player is still A-wall. We have an APB on him and WILL find him sooner or later.

Ralph and Pierre are still seriously into music, I dabble but nothing like these two. We plan to reunite at least for a weekend and jam for old times sake. 30 some years later it is simply unbelievable that we could find each other like this in a few days.
The day was a double surprise for my wife Rima who went to High School with us was also friends Pierre and Ralph. She walked in from the snow storm today while I was talking to Ralph and Pierre. I handed her the phone without saying a word. You should have seen her face when she realised who she was talking to.
Yes it is a small world after all.
Saturday, March 17, 2007
Another Altoids Watercolour Box

 The good folks at the Altoids company keep throwing challenging new boxes my way and I keep taking the bate! The last was this fabulous looking sour chewing gum box. It measures 8.5cm x 3.7cm x 2cm and is about half the size of the regular Altoids box. It also sports a lovely curved top that should serve well in holding water and colour mixes. (You can see my old, well worn, regular Altoids box on the right for comparison)
 The smaller size was a real challenge. At these dimensions the box would not hold more than four standard half pans. Four pans would not really make a useful palette for me, so I looked for quarter pans. I know they used to sell those but I just can't find them anymore (If you know where I can find some please let me know). I finally decided to try using the FIMO clay that you can bake to a hard solid shape.
  I placed the clay in the metal box, smoothed it and used a round flat felt pen end to press 10 holes in the clay. I then smoothed those and placed the whole thing in a toaster oven at 200 degrees for 20 minutes. I took it out, let it cool down and placed colours in the holes.
I still need to enamel the inner cover to use as a mixing well, but I just had to share this one right away.
The box fits easily in a Jeans pocket and with a waterpen it should be enough for impromptu sketching. Not exactly what I would take with me for a plein-air trip, but for a lunch time break outdoors when spring come? It will work just right!
Subscribe to:
Posts (Atom)